Sunday, June 17, 2012

Attack of the Gloss Monster

The plan for this past weekend was more exterior varnish. The weather, however, was a bit too cool on Saturday with a seabreeze. Since I had a carload full of varnishing supplies, I shifted gears slightly and applied varnish to all the interior wood. Stepping inside the cabin this morning was quite a shock. The woodwork had previously been coated with a single coat of varnish thinned 50% to seal it. It looked like wood but nothing special. The new coat of only slightly thinned varnish created a huge increase in the gloss factor. The interior was very bright. It looked nicer for sure but it was bright bright. Too bright. This morning I applied a third coat to the slightly tacky interior varnish which was tricky because it was hard to see the surface with all the gloss. I was applying more by the feel of the brush than by any wetness I could see. It looks much nicer but I will be happy when the rubbed effect coat gets applied. Not much more to say. Quite a few hours with a varnish brush in hand. Next week I will be away so there won't be any progress to show for at least two weeks. Hopefully I will have a new stovetop to show off for next blog post. Em tasol wantoks.

Monday, June 11, 2012

Varnish weather

A retired boat friend of mine has often told me that when varnish weather comes, I must drop everything and varnish. Those days are just too rare to waste. Everytime I wait for a good varnishing day I remember this. I am convinced that a well varnished boat, ready for launch in May, working solely on the weekends, is an impossibility. All the more reason to find that spot of land and build the boatbarn with a radiant heated slab floor so I can varnish at will; preferably in February. Last weekend was a total washout. Literally. Rained cats and dogs all weekend. Even the basement was flooded so I couldn't work there. (not that I have much to do there other than cleanup and I save that job for a 'rainy' day... After a week of rain, the weather broke and we had beautiful weather. Heeding my friend's advice I started varnishing. The toerails were getting desperate, particularly along the top edge that sees the most sun. Given the time, I would probably consider a complete strip. Given what I had, I spot sanded the worst areas and gave myself a year or two before I need to reconsider a complete strip. The toerails, companionway entrance, engine instrument panel and compass holder all received two coats of varnish. While I had the brushes out, I gave the saloon and V-berth soles two coats of clear urethane. There is a bunch more small stuff that is begging for the varnish brush and I hope to keep at it all summer and maybe get ahead of it a little. There is always something more fun to do but I am going to have to devote the time or else face the wrath of the Neglected Varnish Gods. They are never fun to deal with. It is a pretty boring week picture wise. Hours of sanding and brushing. That about sums it up. On another note; I have been agonizing over the choice of a galley stove. I think I have finally decided on one. My inital thought was to go with a three burner drop in stovetop. I always knew I wasn't going to give up enough space for an oven. I would love an oven to bake those cookies on rainy/foggy days stuck on the coast of Maine, but I am afraid I will, like Pooh, eat too many cookies and cakes and have trouble exiting the cabin when the time comes. After some investigation I realized three burners was out of the question for the same reason. Too big; and I really won't need the third burner all that often. Plus, I have a gimbaled sea swing stove that I can use in a pinch if I really HAVE to boil the pasta, stir fry the vegetables, and warm the sauce all at the same time. At that point I still had a bunch of choices left which I narrowed down to either a Dickinson or Seaward model. I was looking at the two dual sized burner models but even they were a little too 'thick' and were going to restrict the length of the port settee berth. The Seaward: And the Dickinson After a fair amount of searching around for what is deemed the 'best' or 'mimimum' btu output to look for. I settled for the Seaward 2276 with dual 7000btu burners. By all accounts they are big 'enough' to do the job and the stovetop is quite thin and there is still a chance of a full length berth (sticking my feet under the stove) on the port side. I expect to be placing an order for one, "any moment now". Along with the foot pumps for the water supply which will make the water system 'nearly' operational. Until next week then, ;-)

Monday, May 28, 2012

Counters, Panels, Soles...

Well, when I took a look at my pictures I realized I hadn't posted in a few weeks. Here is the update as of today. First, the counter tops are in. Finally. Mostly... The countertop structure and surrounding panels were fussed with for a good solid fit and then the countertops were screwed into position. I stopped with screws in case I need to open things up again. One of the rare occasions when I left the epoxy in the can.
I ordered the wrong sized bungs so the screws are still exposed at this point and I haven't oiled the top yet. The starboard two pieces were epoxied together where they mate up. I know I said I didn't use epoxy but all I really did was turn the two pieces into one piece. Screws are still the only things holding the countertop in position.
After the countertops were in, I really wanted to start playing with the storage lockers. However, before I could do that I needed to sort out the the interior 'ceiling' or paneling behind the countertops. To make that happen I started with cardboard mockups that were transferred over to cheap plywood mockups.
I also cut up some blocks to anchor the panels too. I oiled the blocks and then epoxied them to the hull. I learned this great trick from a pro for securing stuff like this without elaborate clamping / positioning techniques. The trick is to apply the epoxy over *most* of the surface and on the remaining free area apply a dab of hot glue. The hot glue sets up in ten seconds or so and holds the blocks adequately until the epoxy can set up.
With the blocks in place (can't find those photos) I used the same plywood templates to cut up the foam insulation that has been applied to the rest of the living area of the hull interior. Once fit, I glued the insulation in place with contact cement. I didn't use the proprietory glue this time. Once again, I opened the can to find the glue had hardened. At $70 a gallon I decided I needed to buy something easier to obtain and in smaller quantities so it wouldn't go bad before the project ended. I have worked a lot with a 3M product called 1300L at my 'real' job so that is what I used this time. Looks and smells the same which is to say, very yellow and sticky with strong overtones of MEK. Only use this stuff with good ventilation. The fumes in a closed boat are unreal...
The side panels were cut and oiled but I didn't get a chance to secure them in place today. Here are pictures showing how they look at this point. Trim and concealing cabinetry have yet to be installed...
The panels are one of those things that once they are in place it seems like they have always been there and one wonders why it looks like nothing has been done lately. Now for that final aft panel.
My battle with mold in the bamboo sole continues. It is in the same location and this time I was more aggressive with the sander and the chlorox. Hopefully this will be the end of it. Otherwise, a small throw rug is going to become part of my interior decorating plan. To be fair, I must admit that I have had some help at the boatyard. So while I was hogging the aft end of the cabin I have been overseeing some work in the V-berth area and doing some of the critical cutting stuff. For a long time I have been looking at ugly undersole.
Now I have new bamboo plywood sole with a nice cherry kickboard in the V-berth :-)
Thank you 'L'. So that's the update. Next should be a little more paneling aft of the galley countertop. Perhaps some galley storage. I need to order and install the water foot pumps and connect the sink drain. I need to settle on a stove top and get that coming so I can move forward with that side of the cabinetry. The V-berth project is gaining a bit of momentum and I hope that will continue (hint hint...) When the weather gets more reliably dry (thankfully the warmth is finally here) then varnishing and the rubrail installation will become the top priority. Interior cabinets are more fun then varnish but when varnishing weather comes then that becomes top priority. Someday I will have a dry heated boatbarn so I can do my varnishing in February... That's it. Nothing more to say. The End. ... until next weekend... Laters, Taters ;-)

Sunday, May 6, 2012

Not quite stalled..

but not a ton of progress as is becoming usual. Not sure how to fix that except keep plugging along and doing what I can when I can. I have been pushing the ball forward in a couple of areas. The countertop project of course. Firstly, the storage bins underneath received more coats of paint and are looking quite spiffy at the moment.
Before assembly there has been more painting to do. I decided to paint under the dish storage area and the drop storage box on the starboard side. The bottoms and non visible areas were coated in straight epoxy for sealing. The plywood has proven quite thirsty and it has taken three coats of bilgekote to get exceptable coverage. The last coat went on today so 'soon' is the plan for final installation of the countertops.
Installing the remaining sound/heat insulation around the engine was another project that was done recently. That funny wooden thing on the engine is my Triton original spicerack/electrical panel. I need to add a electrical plug in the wiring harness so I can disconnect the panel wiring from the engine wiring. Until then I have to remove the rack to keep the wiring harness out of the way of the countertop. That's another 'soon-ish' project.
I also took another stab at fixing that irritating leak that I have been trying to track down. I am pretty sure the leak is starting with the cheap plastic hatch cover on the starboard side which I will use to access one half of the house batteries. Water was pooling up on the battery shelf and being dumped right along the seam between the 'half bulkhead' at the aft end of the cabin area and the plywood panel I used to close off the cabin from the cockpit area. I partially fixed that by cutting a corner off the battery shelf so the water gets dumped further aft and away from the seam.
I also noticed that water could be riding down the manual bilge pump hose (yeah, that grimy one in the photo. Mold has been a constant problem so far even with the improved ventilation). During a rain storm I had applied polysulfide sealant (boatlife) to parts of the seam in a quick and dirty attempt to fix the issue. Today I finished removing the old stuff and doing a better job of getting the goop into place. Having the corner of the battery shelf cut away improved access for my paw-like hands.
Further access was granted after I took another look at my exhaust system. I have been suspicious of it for a few years and I have been keeping a close eye on it for awhile. Its just normal iron piping. Two weeks ago I took a harder look with a three foot crowbar and found the remaining metal not up to my expectations. I was able to break the pipe. That made access easier and resolved me to fixing the exhaust properly. More about that in another post.
Finally, I spent some time trimming the supporting structure for the countertops in preparation for final installation.
And that is where the boat is at the moment. I usually write something about upcoming plans but since I seem to be so bad at predicting what will be getting worked on next I might just stop here and let everyone, including myself, be surprised. If you life in the northern hemisphere then enjoy the spring weather. If you live in the southern hemisphere then... well I am sorry, it sucks to be you. Bundle up 'cause old man winter is a 'knockin :-P Until next time wantoks ;-)

Sunday, April 15, 2012

long delay, little work

The past few weekends haven't been terribly productive. This weekend a little progress was made.

First, I uncovered the boat. I took a picture but the image came out over exposed. Something about having a bright noonday sun shining into the front of a camera with a dark hulled sailboat in the foreground. Its the super bright gleaming awlgrip cabin top. Yeah, that's it. The paint is so good I can only take pictures in low light conditions.

Anyway, the boat looked cleaner than normal under the cover which was nice. A little chafe up around the bow but generally in good condition. The Awlcraft 2000 topside paint is considerably softer than Awlgrip and scratches easily which I am not happy about. It DOES repair much easier than Awlgrip which I AM happy about. Its a tradeoff I guess.

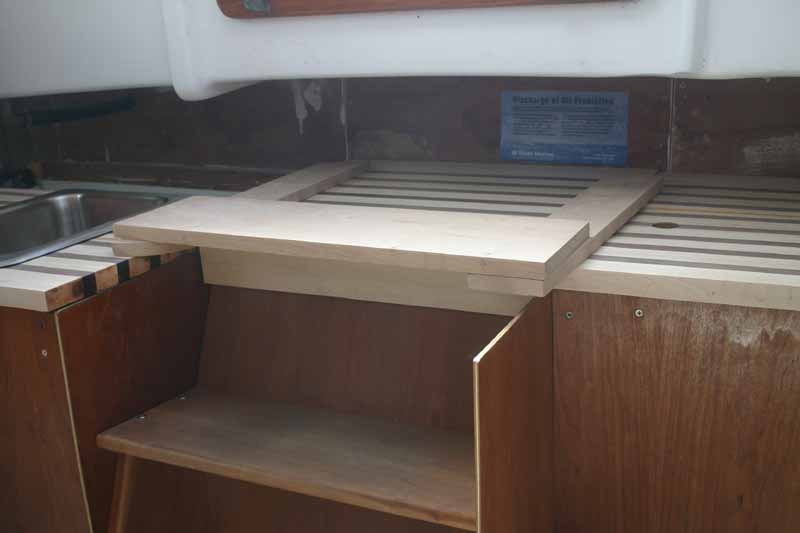
So, the last project was sealing up the undersides of the countertops. I took the parts out today and laid them back in for final fitting and sanding. I stopped short of building the top step because after a few weeks kicking around in the basement I was a bit unsure of the markings I had left to align it all up and wanted to double check the construction.

I lined up the top step perfectly symmetrical to the two lower steps. The problem is, it just doesn't look right.


The step is the exact same height, alignment, and size as the two lower steps but it just doesn't look right. I figured I could take off some of the edges so it didn't look so intrusive but still. It is perfectly symmetrical to the lower steps but looks all wrong.

So I thought maybe I would set it lower, just an inch about the top of the countertop.


Nope. It still didn't look right.

So I laid the step directly on the countertop.


Now it looked better. I tried going up and down the steps several times and you can definitely tell the difference in height on the first step. But somehow it still seems better.

Finally, I just took away the step and ran up and down the steps a few more times using the countertop itself as the top step. There is no symmetry but it feels great. Very weird. For now I am going to forget the step. Unfortunately I was counting on that step to cover up some minor misalignments between the outside and center sections. Oh well.


In amongst this abstract design process, two coats of bilgekote white paint were applied to the inside of the galley lockers. No pictures. Who wants to see the inside of a white box anyway?

Before I ended the day I set the galley drop box in place to check the fit before I epoxy sealed and painted it. Considering how cattywampus everything in the boat is, it fit quite well. Note: the box is only loosely in place and in the picture isn't sitting exactly perfectly in place. It really does fit. Honest.


and that's it. No distractions are in the plan for next weekend so fingers crossed for more progress.

Laters Taters ;-)

Sunday, March 25, 2012

Gloomy weather

The summer-in-spring weather went away this weekend and cool rainy weather ruled the weekend which kept me indoors.


On Saturday, all the countertops had their undersides coated in epoxy. With random bits and pieces scattered all over my basement there really wasn't any where else to work so I had to call it a day at that point.

Sunday, I started by glueing up the storage box that will fit outboard of the sink.


Then, I cut and fit the pieces for the top step. I needed to use the sander to continue on to final installation and with my 'sanding station' a few feet from my furnace air inlet, I decided to stop at that point. It's no fun filling my whole house with sanding dust via the forced air heating system.


So then I glued the front lip onto the center section of the countertop. The lip will lock the front engine cover panel in place and keep it from pitching forward when clumsy people jump on it.


and that's it.

I hope to seal the rest of the drop box in epoxy and when I can work outside I will do the final sanding on the step pieces and install them.

With luck I might even install some of the countertops more or less permanently. Sounds hopelessly optimistic given my track record right?...

Bis spaeter, Freunde