
I had great plans this weekend for something new and exciting to go onto the boat.
But the weekend had other plans for me.
I was asked to give someone a hand for an hour or so that turned into most of Saturday. On Sunday my plans were made for me...
So, about all I managed to do was put a couple of coats of urethane on the cabin sole and place another order for hardware and shop supplies. If I were to add up the costs of all these small hardware orders I would probably give up boat work. You wouldn't think a few bolts and screws and nuts and washers here and there would add up to much. You would be wrong to think that.
Hoping for better luck next weekend.
Sunday, August 15, 2010


Sunday, August 8, 2010
Beat to fit...
Paint to match.
After another hot and humid work week, the weekend turned out to be another really good varnishing weekend. I just didn't feel like varnishing. I didn't feel like doing much of anything this weekend actually.
I made more than my usual number of return trips for forgotten tools and materials. My helper for securing the deck hardware had some last minute changes of plans. The pulpits have different sized backing pads and it appears as though I used the larger pads that I made on the pulpit with the smaller feet - and the smaller pads were too small for the larger feet. I didn't have any more backing pad material so I was out of luck there. I needed to order more for the jib cleat backing pads anyway.
So, this was not my most productive weekend. I spent most of my productive time Saturday sanding the cabin sole hatch lips smooth. Getting the hatches to lie pefectly flat and without any wobble took more work than expected. They aren't beautiful under there but that is what paint is for.
And so speaking of paint, I did prime and paint the sloping fiberglass hull alonside the cabin sole and the hatch edges.


I wasn't able to get the paint matching machine to work on the bamboo because there is too much variation in color in the bamboo. I wound up finding the closest match I could with a paint chip and ordering a pint of that. I put down two coats and used the top 1/4 inch of paint out of the can so I have plenty left for 'other' projects (read: pay for hazardous waste disposal in 10-20 years...).

I also took another look at my jumper strut shrouds. I had them made up new two years ago with 'adjusters' so that I could tweak the tension on the struts after they were up and installed. Well, the adjusters are totally inadequate at the tensions necessary. My first thought was to match up a turnbuckle that I can screw into the end of the shroud just as the adjuster screws in. My second thought was to hand the shrouds over to my rigger and them him figure it out. I am going with my second thought.
And that's it. Everything I said I wanted to do last week is exactly what I want to do next week. I am hoping for a bit more success.
After another hot and humid work week, the weekend turned out to be another really good varnishing weekend. I just didn't feel like varnishing. I didn't feel like doing much of anything this weekend actually.
I made more than my usual number of return trips for forgotten tools and materials. My helper for securing the deck hardware had some last minute changes of plans. The pulpits have different sized backing pads and it appears as though I used the larger pads that I made on the pulpit with the smaller feet - and the smaller pads were too small for the larger feet. I didn't have any more backing pad material so I was out of luck there. I needed to order more for the jib cleat backing pads anyway.
So, this was not my most productive weekend. I spent most of my productive time Saturday sanding the cabin sole hatch lips smooth. Getting the hatches to lie pefectly flat and without any wobble took more work than expected. They aren't beautiful under there but that is what paint is for.
And so speaking of paint, I did prime and paint the sloping fiberglass hull alonside the cabin sole and the hatch edges.


I wasn't able to get the paint matching machine to work on the bamboo because there is too much variation in color in the bamboo. I wound up finding the closest match I could with a paint chip and ordering a pint of that. I put down two coats and used the top 1/4 inch of paint out of the can so I have plenty left for 'other' projects (read: pay for hazardous waste disposal in 10-20 years...).
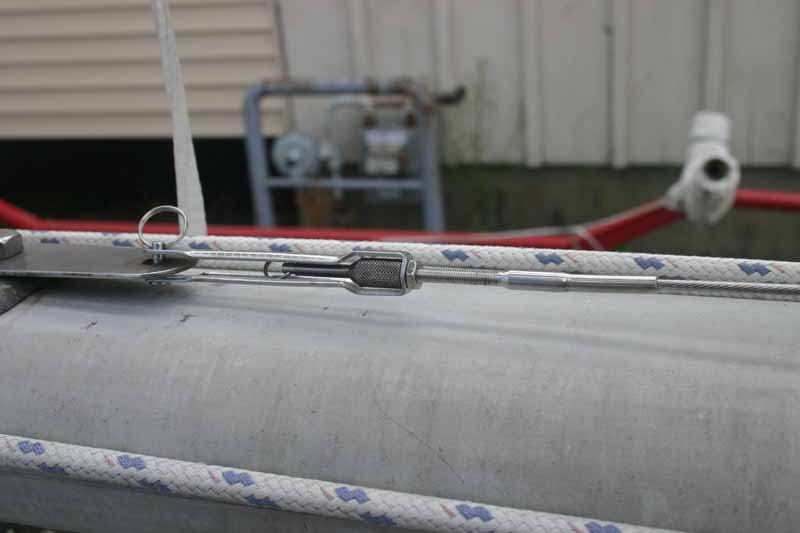
I also took another look at my jumper strut shrouds. I had them made up new two years ago with 'adjusters' so that I could tweak the tension on the struts after they were up and installed. Well, the adjusters are totally inadequate at the tensions necessary. My first thought was to match up a turnbuckle that I can screw into the end of the shroud just as the adjuster screws in. My second thought was to hand the shrouds over to my rigger and them him figure it out. I am going with my second thought.
And that's it. Everything I said I wanted to do last week is exactly what I want to do next week. I am hoping for a bit more success.
Sunday, August 1, 2010
Changes in the weather
A change in the weather meant a change in plans.
For the past month, the temperatures have been in the mid 90's (F) with 90%+ humidity most days.
This weekend, the temperature dipped into the upper 70's low 80's with 50-60% humidity. Perfect varnishing weather. During times like these there isn't any choice. One must drop whatever plans one had and pick up the varnish brush.
So that is what I did. One coat on every piece of wood on Saturday and another coat on Sunday: Toerail/rubrail, engine instrument frame, companionway trim, water deck fitting block, coamings and winchblocks, forehatch, and misc. bow woodwork. That makes a minimum of five coats of varnish on all my wood so I am getting close to an acceptable amount of coverage. At least I won't be worrying about it all the time (for at least a month).

Other than that... I continued to build up the surface that the cabin sole hatches rest upon with a couple of coats of epoxy thickened with WEST 407 (low density fill). My earlier plan of using foam tape fell apart after some thinking. I figured over time the tape would compress and I would either have the hatches sitting too high initially or too low after a period of time. I didn't like either result. Instead, I mixed up some epoxy leaving it just thin enough to self-level before it kicked off. An application last week and the first application this week brought the hatches just about perfectly aligned with the surrounding sole. I applied an additional coating Sunday to help fill in any low spots and give something to sand smooth. Next week I should be able to prime and paint.

Yes. I need to clean out the bilges and apply a fresh coat of paint. Its hard to keep the boat clean while working on it.
I really like my bamboo plywood sole and I only have one caveat about it. Let it sit anywhere near a moist environment for more than a few minutes and mold will spontaneously begin reproducing right in front of your eyes. Mold loves this stuff. It isn't just on the boat either. My stock in the garage grows moldy in no time flat and I have had to clean up my stock a few times. A solvent rag takes care of most of it. A light sanding usually finishes it up clean.
To make the mold problem go away, the bamboo plywood needs to be sealed up. I cleaned up the undersides of the hatch covers where I had not applied any finish before and then gave them all a coat of clean polyurethane on the bottom surfaces. One more coat and they should be good to go. Any of the bamboo that has been sealed this way exhibits no tendency to mass produce mold babies.

Sound like nothing happened. Maybe. Setting up for varnishing everything on deck takes more time than I would like. Nothing looks better but it does take some work. Beauty costs.
On another note. After some emails with a fellow boat restorer I need to add some thoughts about on last week's projects.
I woke up the next day thinking about the broken taper bit and the bronze screws I was using to secure the bronze foredeck cowl. After reviewing the failed installation I realized that I did not like how the screw felt going into the thickened epoxy plug. My email correspondece confirmed a better technique I was thinking about- drilling and tapping for machine screws. Taper bits just don't work well in epoxy. I think the tapped machine threads is a much better solution. Now I just need to order the machine screws. On a different note, with the cowl over the new hole in the foredeck I noticed a vast improvement in the air quality below decks when I went below after a week away Saturday. The ventilation is much better now.
The second idea we talked about was one I had heard of and then prompty forgot. The time consuming method I had for drilling the mounting screws through the backing pads could be dramatically improved with a hot glue gun. Mix up some thickened epoxy and goop it on the backing pad, apply hot glue to a few points on the backing pad and stick it into position. The hot glue sets up in a minute and holds the backing pad while the epoxy takes a full cure. Then it is a simple method of drilling through for the mounting bolts. Of course that means the backing pads will never come off again but why would anyone want to take them off ?...
Finally, the green composite material I was using for backing pads is not G10 after all. It is a polyester layup. Completely adequate for what I was using it for but I feel the need to make the correction public and reduce the amount of bad information found on the Internet (a hopeless task I know). I don't know where that stuff came from. It has been in my stock pile for a few years now and I guess I just forgot what it was.
So that was the weekend and another month of summer is gone. I have the bow pulpit, jib sheet cleats and stern cleats to install. I hope to get my new Monitor wind vane mount out of my basement where it has been taking up space for the past five years and finally get it installed on the boat. I am still trying to get enough done on the actual sailing hardware list to be able to spend some time and money this Fall on some interior paneling. If I can keep plugging away I have hopes of some interior installed before Old Man Winter comes to visit again.
I say, I say, I say... That's all folks!
For the past month, the temperatures have been in the mid 90's (F) with 90%+ humidity most days.
This weekend, the temperature dipped into the upper 70's low 80's with 50-60% humidity. Perfect varnishing weather. During times like these there isn't any choice. One must drop whatever plans one had and pick up the varnish brush.
So that is what I did. One coat on every piece of wood on Saturday and another coat on Sunday: Toerail/rubrail, engine instrument frame, companionway trim, water deck fitting block, coamings and winchblocks, forehatch, and misc. bow woodwork. That makes a minimum of five coats of varnish on all my wood so I am getting close to an acceptable amount of coverage. At least I won't be worrying about it all the time (for at least a month).

Other than that... I continued to build up the surface that the cabin sole hatches rest upon with a couple of coats of epoxy thickened with WEST 407 (low density fill). My earlier plan of using foam tape fell apart after some thinking. I figured over time the tape would compress and I would either have the hatches sitting too high initially or too low after a period of time. I didn't like either result. Instead, I mixed up some epoxy leaving it just thin enough to self-level before it kicked off. An application last week and the first application this week brought the hatches just about perfectly aligned with the surrounding sole. I applied an additional coating Sunday to help fill in any low spots and give something to sand smooth. Next week I should be able to prime and paint.

Yes. I need to clean out the bilges and apply a fresh coat of paint. Its hard to keep the boat clean while working on it.
I really like my bamboo plywood sole and I only have one caveat about it. Let it sit anywhere near a moist environment for more than a few minutes and mold will spontaneously begin reproducing right in front of your eyes. Mold loves this stuff. It isn't just on the boat either. My stock in the garage grows moldy in no time flat and I have had to clean up my stock a few times. A solvent rag takes care of most of it. A light sanding usually finishes it up clean.
To make the mold problem go away, the bamboo plywood needs to be sealed up. I cleaned up the undersides of the hatch covers where I had not applied any finish before and then gave them all a coat of clean polyurethane on the bottom surfaces. One more coat and they should be good to go. Any of the bamboo that has been sealed this way exhibits no tendency to mass produce mold babies.

Sound like nothing happened. Maybe. Setting up for varnishing everything on deck takes more time than I would like. Nothing looks better but it does take some work. Beauty costs.
On another note. After some emails with a fellow boat restorer I need to add some thoughts about on last week's projects.
I woke up the next day thinking about the broken taper bit and the bronze screws I was using to secure the bronze foredeck cowl. After reviewing the failed installation I realized that I did not like how the screw felt going into the thickened epoxy plug. My email correspondece confirmed a better technique I was thinking about- drilling and tapping for machine screws. Taper bits just don't work well in epoxy. I think the tapped machine threads is a much better solution. Now I just need to order the machine screws. On a different note, with the cowl over the new hole in the foredeck I noticed a vast improvement in the air quality below decks when I went below after a week away Saturday. The ventilation is much better now.
The second idea we talked about was one I had heard of and then prompty forgot. The time consuming method I had for drilling the mounting screws through the backing pads could be dramatically improved with a hot glue gun. Mix up some thickened epoxy and goop it on the backing pad, apply hot glue to a few points on the backing pad and stick it into position. The hot glue sets up in a minute and holds the backing pad while the epoxy takes a full cure. Then it is a simple method of drilling through for the mounting bolts. Of course that means the backing pads will never come off again but why would anyone want to take them off ?...
Finally, the green composite material I was using for backing pads is not G10 after all. It is a polyester layup. Completely adequate for what I was using it for but I feel the need to make the correction public and reduce the amount of bad information found on the Internet (a hopeless task I know). I don't know where that stuff came from. It has been in my stock pile for a few years now and I guess I just forgot what it was.
So that was the weekend and another month of summer is gone. I have the bow pulpit, jib sheet cleats and stern cleats to install. I hope to get my new Monitor wind vane mount out of my basement where it has been taking up space for the past five years and finally get it installed on the boat. I am still trying to get enough done on the actual sailing hardware list to be able to spend some time and money this Fall on some interior paneling. If I can keep plugging away I have hopes of some interior installed before Old Man Winter comes to visit again.
I say, I say, I say... That's all folks!
Sunday, July 25, 2010
Wanting is...
the root of all unhappiness.
If I didn't want boat work to progress faster I would not be unhappy with the progress. Saturday was a demonstration in progress against all odds. Sunday was somewhat better.
During the week, I installed my new 1/8 inch blade in the new bandsaw and cut out backing pads for some of the deck hardware. After using hand tools for so long I forgot how nice a fixed shop tool can be. It was a much more pleasant experience cutting the blocks out. For the pads I used G10 which is great stuff (pre-made sheets of epoxy/fiberglass composite with a near perfect ratio of resin to fiber). McMaster and Carr has it among other sources. When I first got the boat I didn't know about it and was using epoxy coated plywood. It is working okay but the G10 is far superior. For some reason I had two pieces of G10 in 1/4 inch and 3/8 inch thicknesses. I have no idea why I had the 3/8 inch stock. The 1/4 inch was fine. All the same, I had to use the thicker stuff up so I used the 3/8 inch stock for under the stanchion bases. Had I been really smart I would have pre-painted the pads. I briefly considered postponing installation to paint the pads but decided I couldn't stand any more delays. The pads will most likely be hidden behind cabinetry and can always be painted afterwards in any case.

I had anticipated installing everything easily within a day. How silly of me. The little things took forever. First, I had to drill the pads for the mounting holes. I had already learned that I could not simply put the pad against the fitting and use the fiting as a drill guide. While the holes through the deck look straight, they are usually not, and after traveling though an inch of deck the holes don't come out directly under where they went in. In other words, somewhere in the drilling process a little crookedness is introduced. The solution is to drill one hole and then temporarily secure the pad via the single bolt hole. Then drill the opposite hole and run another bolt through to fix the pad into position. Then I was able to drill the remaining two (or whatever) holes in the pads. This means the pads are perfectly drilled... unless they get flipped upside down. Its a good idea to mark the orientation of the pads before walking away. No need to ask me why I believe this.
So, most of Saturday was spent drilling on deck and then going below to fuss with a pad and then going up and drilling a second hole and then going below... etc. I had to make several trips back home to pick up a forgotten tool or two. I was nearly done when my large and torque-y drill motor got the drill bit slightly stuck and promptly snapped the bit in two. I only had the one bit so I was finished with drilling for the day.
No problem, I wanted to mount my foredeck cowl. I used a taper drill to pre-drill for the mounting screws. I reached for my tube of sealant and found the end to be solid. No problem, I grabbed the first available tool - the new taper drill bit - and stuck it in the end of the tube and gave it a whirl. The new taper drill bit snapped in half.
Okay, I grabbed my utility knife and cut into the side of the tube and sort of spread the sealant out in a less than precise manner. I then set the cowl on top of the sealant and started screwing the mount screws down. Apparently I didn't drill quite far enough with the taper drill. Since I had just broken the taper drill I couldn't go back and drill a little deeper. I figured I could just muscle the screw down the last 1/8 inch. And that is how I snapped the screw in half. So, after pitching the remaining tube of sealant half way across the boatyard, I grabbed a roll of paper towels and wiped up/smeared around the sealant figuring I would try another day.
A long work week and temperatures in the 90's with 90%+ humidity might have contributed to my fatigue and set me up for the series of small failures. I was pretty disgusted with boatwork Saturday night.
Sunday I slept late and ate a good breakfast with 'my boys' at the diner which put me in a much better mood. I was able to buy some new drill bits and finish drilling the holes and then bribed a helper with a fried clam lunch to make installing the hardware go more smoothly.
Thanks Mom.
A few issues still managed to crop up. The pad for the aft stanchions straddles the division between the underside of the raw deck and the interior liner. The thickness is about the same but the angle between the two is a little off. That meant that the bolts that I had ordered were too short. Once I tightened one side of the stanchion base, the pad pulled away from the underside of the deck too far for the bolts to reach, I tried starting the bolts in different orders but in the end, I deemed it better to clean up and try again next week with longer bolts.
The other issue I had was that I had grabbed what I thought was 1/4 inch and 5/16 inch washers from my hardware rack. That is what I thought I had done. In fact, I had 1/4 inch washers with different sized outside diameters. The middle stanchion bases use 5/16 inch bolts and I didn't have any washers. I decided to mount the bases without washers. I was using the 3/8 inch thick G10 under the stanchion bases so I think they can handle nuts without washers. In two years when I re-bed the deck hardware I can add the washers.


Next, with my helper, I was able to mount the jib tracks. I didn't use a backing pad under the tracks, just some large area washers. There are 13 bolts holding each track in place so I think the washers alone will do just fine.
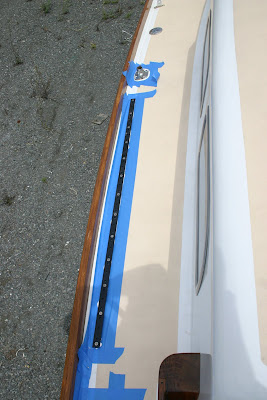

Yes, that is mold on the underside of the side deck. When there is water in the bilge, and the boat is closed up for a week, and the temperatures are in the 90's, mold spores go into a breeding frenzy. I didn't have anything on hand in the truck to clean it up and I wasn't going back home to get it.
After supplying my helper with the fried clam lunch I went back and installed the stern pulpit.

And by then I was pretty well cooked, working in the bright sun in the 90 degree weather.
The forward pulpit will have to wait until next week.
I might shift gears and get more varnish down if the weather cooperates. The three applications of varnish are looking a little thin already. No biggy. If I varnish I will continue with the cabin sole painting. There is always something to do.
If I didn't want boat work to progress faster I would not be unhappy with the progress. Saturday was a demonstration in progress against all odds. Sunday was somewhat better.
During the week, I installed my new 1/8 inch blade in the new bandsaw and cut out backing pads for some of the deck hardware. After using hand tools for so long I forgot how nice a fixed shop tool can be. It was a much more pleasant experience cutting the blocks out. For the pads I used G10 which is great stuff (pre-made sheets of epoxy/fiberglass composite with a near perfect ratio of resin to fiber). McMaster and Carr has it among other sources. When I first got the boat I didn't know about it and was using epoxy coated plywood. It is working okay but the G10 is far superior. For some reason I had two pieces of G10 in 1/4 inch and 3/8 inch thicknesses. I have no idea why I had the 3/8 inch stock. The 1/4 inch was fine. All the same, I had to use the thicker stuff up so I used the 3/8 inch stock for under the stanchion bases. Had I been really smart I would have pre-painted the pads. I briefly considered postponing installation to paint the pads but decided I couldn't stand any more delays. The pads will most likely be hidden behind cabinetry and can always be painted afterwards in any case.

I had anticipated installing everything easily within a day. How silly of me. The little things took forever. First, I had to drill the pads for the mounting holes. I had already learned that I could not simply put the pad against the fitting and use the fiting as a drill guide. While the holes through the deck look straight, they are usually not, and after traveling though an inch of deck the holes don't come out directly under where they went in. In other words, somewhere in the drilling process a little crookedness is introduced. The solution is to drill one hole and then temporarily secure the pad via the single bolt hole. Then drill the opposite hole and run another bolt through to fix the pad into position. Then I was able to drill the remaining two (or whatever) holes in the pads. This means the pads are perfectly drilled... unless they get flipped upside down. Its a good idea to mark the orientation of the pads before walking away. No need to ask me why I believe this.
So, most of Saturday was spent drilling on deck and then going below to fuss with a pad and then going up and drilling a second hole and then going below... etc. I had to make several trips back home to pick up a forgotten tool or two. I was nearly done when my large and torque-y drill motor got the drill bit slightly stuck and promptly snapped the bit in two. I only had the one bit so I was finished with drilling for the day.
No problem, I wanted to mount my foredeck cowl. I used a taper drill to pre-drill for the mounting screws. I reached for my tube of sealant and found the end to be solid. No problem, I grabbed the first available tool - the new taper drill bit - and stuck it in the end of the tube and gave it a whirl. The new taper drill bit snapped in half.
Okay, I grabbed my utility knife and cut into the side of the tube and sort of spread the sealant out in a less than precise manner. I then set the cowl on top of the sealant and started screwing the mount screws down. Apparently I didn't drill quite far enough with the taper drill. Since I had just broken the taper drill I couldn't go back and drill a little deeper. I figured I could just muscle the screw down the last 1/8 inch. And that is how I snapped the screw in half. So, after pitching the remaining tube of sealant half way across the boatyard, I grabbed a roll of paper towels and wiped up/smeared around the sealant figuring I would try another day.
A long work week and temperatures in the 90's with 90%+ humidity might have contributed to my fatigue and set me up for the series of small failures. I was pretty disgusted with boatwork Saturday night.
Sunday I slept late and ate a good breakfast with 'my boys' at the diner which put me in a much better mood. I was able to buy some new drill bits and finish drilling the holes and then bribed a helper with a fried clam lunch to make installing the hardware go more smoothly.
Thanks Mom.
A few issues still managed to crop up. The pad for the aft stanchions straddles the division between the underside of the raw deck and the interior liner. The thickness is about the same but the angle between the two is a little off. That meant that the bolts that I had ordered were too short. Once I tightened one side of the stanchion base, the pad pulled away from the underside of the deck too far for the bolts to reach, I tried starting the bolts in different orders but in the end, I deemed it better to clean up and try again next week with longer bolts.
The other issue I had was that I had grabbed what I thought was 1/4 inch and 5/16 inch washers from my hardware rack. That is what I thought I had done. In fact, I had 1/4 inch washers with different sized outside diameters. The middle stanchion bases use 5/16 inch bolts and I didn't have any washers. I decided to mount the bases without washers. I was using the 3/8 inch thick G10 under the stanchion bases so I think they can handle nuts without washers. In two years when I re-bed the deck hardware I can add the washers.


Next, with my helper, I was able to mount the jib tracks. I didn't use a backing pad under the tracks, just some large area washers. There are 13 bolts holding each track in place so I think the washers alone will do just fine.


Yes, that is mold on the underside of the side deck. When there is water in the bilge, and the boat is closed up for a week, and the temperatures are in the 90's, mold spores go into a breeding frenzy. I didn't have anything on hand in the truck to clean it up and I wasn't going back home to get it.
After supplying my helper with the fried clam lunch I went back and installed the stern pulpit.

And by then I was pretty well cooked, working in the bright sun in the 90 degree weather.
The forward pulpit will have to wait until next week.
I might shift gears and get more varnish down if the weather cooperates. The three applications of varnish are looking a little thin already. No biggy. If I varnish I will continue with the cabin sole painting. There is always something to do.
Sunday, July 18, 2010
Deck progress
Sorry, no new pictures. I had planned on working both days this weekend but Sunday had other plans for me. I left the camera at home Saturday thinking the intermediate pictures would be rather dull and the final pictures (might) be more interesting. Since there was no Sunday work, there are no pictures.
On Saturday I drilled through the holes I had epoxy filled last week to the final dimensions. Then I was able to insert a known length bolt into the holes and determine the hardware I needed to install the stanchion bases, pulpits, jib sheet tracks and forward deck cowl.
I noticed a problem for the first time with jib tracks. Well two actually but one is very minor. The minor issue was that after drilling out the end holes for the jib tracks and pinning the tracks in place loosely with bolts (so that I could use the tracks as templates for the intermediate holes) I realized that the aluminum tracks bend quite easily and I *could* have bent the tracks to follow the outside curve of the decks. That would have looked a bit nicer than the straight tracks I set up for. I wasn't going to correct the minor issue but next time I would probably bend the track. Just for a slight visual improvement.
The more important issue was the lifeline set up. In my head, I was going to install a support brace for the aft stanchion so I could attach a fixed lifeline to the forward end under tension, and install a short section of removable lifeline aft of the aft stanchion - between the stanchion and the stern pulpit- for easy boarding. The only purpose was so I could removed the lifeline for boarding and not have the whole lifeline sag down. That has always been my plan. However, now that I have the jib tracks being installed I realize that the support brace needs to attach to the deck right where the track is. I can't run the support brace aft because 1.) It wouldn't be as strong. 2.) it would look funny 3.) aft of the stanchion would put the brace right over the big deck drain. There just isn't any room.
So maybe I will let the lifeline sag or maybe I will attach some sort of crimp fitting on by the stanchion tube to hold the lifeline up. The crimp won't be as strong or as visually clean but the lifeline will only be disconnected when the boat is at rest anyway when the lifelines are not so critical to have.
As some fellow boat restorers are fond of saying 'Damned because it is all connected'. Everything you do effects everything else in a myriad of ways that you cannot possibly imagine before you start the project. The challenge keeps it fun I guess.
Once I figured out my hardware needs I put in an order with Boltdepot.com. They are pretty good with the random small quantities I need.
Other than that, I sanded hull alongside the cabin sole in the area between the sole and the vertical cabinet panels. Another fellow boat restorer mentioned to me privately that filling and smoothing the hull sections would have been much easier before I had the sole installed. He learned that the hard way. I guess now I have too. Next time I will fill and smooth the hull before installing the sole. I managed to get it done but it took a lot more care and time than it needed to.
I was also going to fill in around the cabin sole hatch covers with another application of thickened epoxy but I decided to hold off and see if some foam tape might work well there. The tape would add the little height I need and would soften the contact area between the sole and hatch. The tape might also depress over time leaving the hatch cover slightly lower than the sole. I might try it and see how it works. I can always build up the lip that the hatch lids sit on later.
Sorry about no pictures. How about I post a few old picturs to remember how far the project has come and not always be thinking how far it has to go...


On Saturday I drilled through the holes I had epoxy filled last week to the final dimensions. Then I was able to insert a known length bolt into the holes and determine the hardware I needed to install the stanchion bases, pulpits, jib sheet tracks and forward deck cowl.
I noticed a problem for the first time with jib tracks. Well two actually but one is very minor. The minor issue was that after drilling out the end holes for the jib tracks and pinning the tracks in place loosely with bolts (so that I could use the tracks as templates for the intermediate holes) I realized that the aluminum tracks bend quite easily and I *could* have bent the tracks to follow the outside curve of the decks. That would have looked a bit nicer than the straight tracks I set up for. I wasn't going to correct the minor issue but next time I would probably bend the track. Just for a slight visual improvement.
The more important issue was the lifeline set up. In my head, I was going to install a support brace for the aft stanchion so I could attach a fixed lifeline to the forward end under tension, and install a short section of removable lifeline aft of the aft stanchion - between the stanchion and the stern pulpit- for easy boarding. The only purpose was so I could removed the lifeline for boarding and not have the whole lifeline sag down. That has always been my plan. However, now that I have the jib tracks being installed I realize that the support brace needs to attach to the deck right where the track is. I can't run the support brace aft because 1.) It wouldn't be as strong. 2.) it would look funny 3.) aft of the stanchion would put the brace right over the big deck drain. There just isn't any room.
So maybe I will let the lifeline sag or maybe I will attach some sort of crimp fitting on by the stanchion tube to hold the lifeline up. The crimp won't be as strong or as visually clean but the lifeline will only be disconnected when the boat is at rest anyway when the lifelines are not so critical to have.
As some fellow boat restorers are fond of saying 'Damned because it is all connected'. Everything you do effects everything else in a myriad of ways that you cannot possibly imagine before you start the project. The challenge keeps it fun I guess.
Once I figured out my hardware needs I put in an order with Boltdepot.com. They are pretty good with the random small quantities I need.
Other than that, I sanded hull alongside the cabin sole in the area between the sole and the vertical cabinet panels. Another fellow boat restorer mentioned to me privately that filling and smoothing the hull sections would have been much easier before I had the sole installed. He learned that the hard way. I guess now I have too. Next time I will fill and smooth the hull before installing the sole. I managed to get it done but it took a lot more care and time than it needed to.
I was also going to fill in around the cabin sole hatch covers with another application of thickened epoxy but I decided to hold off and see if some foam tape might work well there. The tape would add the little height I need and would soften the contact area between the sole and hatch. The tape might also depress over time leaving the hatch cover slightly lower than the sole. I might try it and see how it works. I can always build up the lip that the hatch lids sit on later.
Sorry about no pictures. How about I post a few old picturs to remember how far the project has come and not always be thinking how far it has to go...


Sunday, July 11, 2010
Mixed progress
The only thing holding me back from sailing last season was a lack of deck hardware. So Saturday I was all geared up for deck work. After opening up the boat and getting some much needed ventilation, I realized I had left my power cord at home so I went back for it. At the house I looked up to see dark clouds. Halfway back to the boat the heavens opened up and dropped an ocean of water everywhere.
So all I managed to do Saturday was to get the insides all wet...
Sunday didn't look much better but I decided to dodge raindrops and get some work done where I could. I started by laying up the jib sheet tracks. I laid the four foot tracks equi-distant to the stanchion bases and far enough from the toerail to make it look 'right'. Then I drilled and filled the holes with thickened epoxy. I took a series of pictures of the operation in case someone doesn't know what I am talking about. Unfortunately, the white deck and bright sun washed out the photos beyond any form of recognition. I have a fancy camera but sometimes I forget to pay attention to what it is trying to tell me. Next week I will drill through the new epoxy for the actual mounting hardware. In the middle of this I had to button up and wait out a rain shower.

After the rain shower things cleared up considerably so I continued with the stern rail. The holes for the forward posts were the original ones but I had to make new holes for the aft posts. And yes, I will spend some time cleaning up the original pulpits before being permanently mounted.


With the weather continuing to hold I went ahead and set up the bow pulpit. Those holes I didn't have to drill and fill as they were the original ones. Next time I would have filled the holes before re-doing the decks and made new holes when I was ready for them. The pulpit has to be tortured a bit to get it into position using the original holes.

By this time the high heat and humidity were cooking me to something past well done. I spent a few more minutes and drilled and filled holes for my bronze cowl that I got off of Ebay last fall.


The heavy rain on Saturday that came in several hours early really upset my schedule. At least Sunday was partially salvagable.
Next week I need to cut out the backing plates for the rails (new bandsaw blade just for this is on order) drill out the holes and measure for the correct length hardware. And then I can finish mounting everything and have a working sailboat again for the first time in four years!
Then I need to finish everything else...
So all I managed to do Saturday was to get the insides all wet...
Sunday didn't look much better but I decided to dodge raindrops and get some work done where I could. I started by laying up the jib sheet tracks. I laid the four foot tracks equi-distant to the stanchion bases and far enough from the toerail to make it look 'right'. Then I drilled and filled the holes with thickened epoxy. I took a series of pictures of the operation in case someone doesn't know what I am talking about. Unfortunately, the white deck and bright sun washed out the photos beyond any form of recognition. I have a fancy camera but sometimes I forget to pay attention to what it is trying to tell me. Next week I will drill through the new epoxy for the actual mounting hardware. In the middle of this I had to button up and wait out a rain shower.

After the rain shower things cleared up considerably so I continued with the stern rail. The holes for the forward posts were the original ones but I had to make new holes for the aft posts. And yes, I will spend some time cleaning up the original pulpits before being permanently mounted.


With the weather continuing to hold I went ahead and set up the bow pulpit. Those holes I didn't have to drill and fill as they were the original ones. Next time I would have filled the holes before re-doing the decks and made new holes when I was ready for them. The pulpit has to be tortured a bit to get it into position using the original holes.

By this time the high heat and humidity were cooking me to something past well done. I spent a few more minutes and drilled and filled holes for my bronze cowl that I got off of Ebay last fall.


The heavy rain on Saturday that came in several hours early really upset my schedule. At least Sunday was partially salvagable.
Next week I need to cut out the backing plates for the rails (new bandsaw blade just for this is on order) drill out the holes and measure for the correct length hardware. And then I can finish mounting everything and have a working sailboat again for the first time in four years!
Then I need to finish everything else...
Subscribe to:
Posts (Atom)